Want more CODs, not just leads? You’re in the right place.

How to Build a Retail Appliance Model & Serial Tag Parser Using AI and n8n

Share:

If you have ever done a physical appliance inventory, you already know how painful this part is. Crawling behind units, taking pictures of model tags, and then manually typing out those long serial numbers.

You type it, double-check for typos, and then realize later you missed a digit .

When we had to do a full warehouse inventory, this step alone was costing us hours of manual labor. It also introduced errors that caused massive headaches in our inventory system later on.

That is why we built this automation. It eliminated the manual work almost entirely.

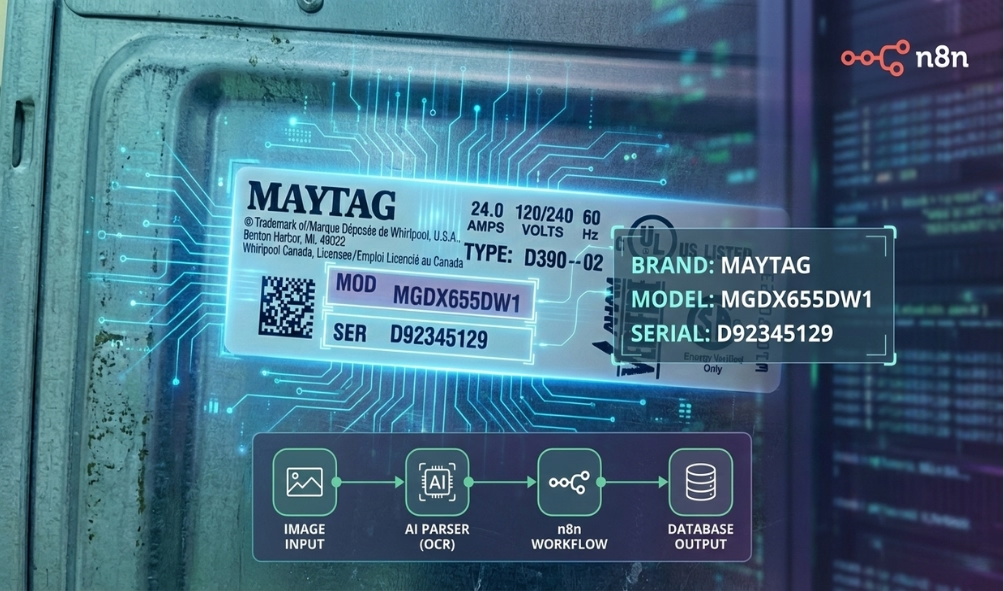
This article walks you through how to build a Retail Appliance Model & Serial Tag Parser Using AI and n8n so you never have to squint at a serial tag again.

Key Takeaways

  • No More Typing: The automation extracts model and serial numbers directly from photos, so you don’t have to type a single character.
  • AI Technician: An AI agent analyzes the tag like an expert, ignoring irrelevant numbers and identifying the correct data.
  • Confidence Scoring: The system grades its own work. If it isn’t 70% sure, it flags the item for human review.
  • Auto-Organization: It automatically renames your image files with the Model and Serial number, making them searchable later.
  • Real-World Ready: Designed to handle blurry photos, glare, and partial labels that happen in a real warehouse.

The Real Problem This Solves

Retail and warehouse inventory breaks down because humans get tired. Model tags are inconsistent across brands, and serial numbers are long and error-prone .

Photos are easy to take, but processing them is hard. When you force staff to manually enter data for hours, fatigue sets in, and that is when typos happen.

The solution isn’t to tell your team to “type faster.” The solution is to not type at all .

What This Automation Does (Plain English)

Here is what happens automatically when you use this workflow:

  1. You take a picture of an appliance model tag.
  2. You upload it into a specific Google Drive folder.
  3. AI reads the tag just like an experienced technician would.
  4. The Model and Serial numbers are extracted.
  5. A confidence score is assigned to the result.
  6. The data is logged directly into Google Sheets.
  7. The image file is renamed and organized automatically.


No manual typing. No copy-paste. No guessing.

Designed for Real Warehouse Conditions

We didn’t build this for perfect studio lighting.

This workflow assumes you will have blurry photos, glare, partial labels, and tags with multiple confusing numbers on them .

That is why it uses multiple AI layers instead of just basic OCR (Optical Character Recognition).

How the Automation Actually Works

1. Google Drive Folder Trigger

The workflow watches a specific Google Drive folder. Whenever a new image is added, the automation triggers immediately. There are no buttons to click and no apps to open. This makes it perfect for warehouse teams using phones or tablets to upload simultaneously.

2. Image Download & Preprocessing

The image file is downloaded into the workflow so it can be processed. This ensures we get full resolution without compression artifacts, which leads to better accuracy.

3. OCR Layer (Text Extraction)

The workflow sends the image to an OCR engine (like Mistral OCR). This step reads all visible text and preserves the layout . However, OCR just gives us raw text. It doesn’t know which number is the serial and which is the voltage.

4. AI Agent: "Expert Appliance Technician"

Now the real intelligence kicks in. We prompt an AI agent to behave like an appliance technician with 20+ years of experience. Its job is to analyze the OCR output, identify the correct model and serial numbers, and ignore the irrelevant stuff. Crucially, if the tag is unclear, the AI is instructed not to guess.

5. JSON-Only Output (No Fluff)

The AI must return strictly structured data (JSON). It gives us the model_number, serial_number, and a confidence score (0-100). This prevents random text from breaking the automation and allows us to use logic downstream.

6. Confidence-Based Decision Logic

A Switch node checks that confidence score.

  • ≥ 70% Confidence: Considered reliable. The data is logged, and the image is processed .
  • < 70% Confidence: The image is flagged and moved to a “Failed” folder for human review . This prevents bad data from contaminating your inventory records.

7. Automatic File Renaming

For the high-confidence images, the file is renamed to MODEL SERIAL. This small step saves a surprising amount of time because it makes your files searchable and auditable later.

8. Google Sheets Inventory Logging

The final step logs the results into Google Sheets. It captures the Model, Serial, Confidence Score, and a direct link to the image . It even handles duplicates by updating rows if the same serial is scanned again.

How This Was Used in Real Life

During a recent warehouse inventory, staff simply walked the floor taking photos. No typing was required, and virtually no training was needed. The inventory populated in real-time. Low-confidence items were reviewed later.

What normally took days was reduced to a fraction of the time, with far fewer errors.

Who This Automation Is For

  • Appliance retailers.
  • Scratch & dent warehouses.
  • Open-box appliance sellers.
  • Service companies with inventory.
  • Anyone who has ever typed a serial number twice because they didn’t trust themselves the first time.

Why This Works So Well

This workflow succeeds because it balances automation with human judgment. OCR extracts the text, AI applies the judgment, and confidence scores control the risk. Humans only have to review the exceptions. AI does the boring work.

How to Configure the Retail Model & Serial Tag Parser (Step-by-Step)

This automation is designed so you can import a ready-made workflow and just connect your accounts. No logic needs to be rebuilt.

What You'll Need Before You Start

Make sure you have:

  • An n8n account (cloud or self-hosted).
  • A Google Drive account.
  • A Google Sheets account.
  • An AI provider API key (for OCR + interpretation).
  • A smartphone or tablet for taking photos.

Step 1 - Import the Workflow into n8n

  1. Log into your n8n dashboard.
  2. Go to WorkflowsImport.
  3. Upload the file Retail Model Parser.json.
  4. Save the workflow, but leave it OFF for now.

Step 2 - Configure the Google Drive Trigger (Image Intake)

This automation starts when a photo is added to a specific folder.

  1. Open the Google Drive Trigger node.
  2. Click Create New Credential and authorize your Google account.
  3. Select or create a folder, for example: /Inventory/Model Tags/Incoming.
  4. Save the node. This folder is now your drop zone.

Step 3 - Create Supporting Drive Folders (Important)

The workflow expects two additional folders to organize the files. Create these manually in Google Drive:

  • Processed / Success
  • Needs Review / Failed


Note the Folder IDs for these; you will map them later so the automation knows where to move files.

You’ll map these IDs later so the automation can:

  • Move clean images automatically
  • Separate low-confidence results for review

Step 4 - Connect the OCR Service (Image → Text)

  1. Open the OCR node.
  2. Add your OCR service credentials.
  3. Leave all extraction settings as-is.


Do not replace this with basic OCR. This specific setup is needed to handle messy tags.

Step 5 - Configure the AI Agent (Critical Step)

This is where the automation “understands” the tag.

  1. Open the AI Agent node.
  2. Create or select your AI credentials.
  3. Review the prompt. It is instructed to identify model/serial numbers and never guess. Do not remove the JSON-only output requirement or the confidence scoring. These keep the workflow safe.


The AI is instructed to:

  • Act like an experienced appliance technician
  • Identify only the correct model number
  • Identify only the correct serial number
  • Ignore other numbers
  • Assign a confidence score
  • Never guess

Do NOT remove:

  • JSON-only output requirement
  • Confidence scoring
  • “Do not guess” rules

These are what make the workflow safe.

Step 6 - Review Confidence Threshold Logic

A Switch / IF node checks the score. By default, ≥ 70% is treated as reliable and logged. Anything < 70% is moved to the “Needs Review” folder. You can adjust this, but 70% usually works well.

Step 7 - Configure Automatic File Renaming

High-confidence images are renamed automatically to MODEL_NUMBER – SERIAL_NUMBER. No setup is required here unless you want a different naming format.

Format:

MODEL_NUMBER – SERIAL_NUMBER

Example:

WRF535SWHZ – KX2134567.jpg

This makes:

  • Audits easier
  • Duplicate detection possible
  • Files searchable later

Step 8 — Connect Google Sheets (Inventory Log)

  1. Open the Google Sheets node.
  2. Create a new spreadsheet with columns: Model, Serial, Confidence, Image Link, and Status.
  3. Paste the Spreadsheet ID into the node.
  4. Connect your Google credentials.


The workflow:

  • Appends new rows
  • Updates existing rows if the same serial appears again

Step 9 - Test with Real Photos (Very Important)

Before turning it on:

  1. Click Test Workflow.
  2. Upload one clean photo and one blurry photo.
  3. Confirm the clean photo is logged and moved to “Success.”
  4. Confirm the blurry photo is moved to “Needs Review”.


If something fails:

  • It’s usually a Drive folder ID mismatch
  • Or a Sheets column mismatch

Step 10 - Turn the Workflow ON

Once testing passes, toggle the workflow to Active. From now on, photos become inventory records automatically.

From now on:

  • Photos become inventory records automatically
  • Staff only take pictures
  • Humans only review exceptions

How to Use This in the Warehouse
(Real-World SOP)

  1. Walk the warehouse with a phone.
  2. Take a clear photo of each model tag.
  3. Upload photos to the intake folder.
  4. Continue working.
  5. Review only the flagged items later . No typing. No double-checking serials.


You will need no typing nor double-checking serials.

Common Mistakes to Avoid

  • Taking photos too far away.
  • Cutting off part of the label.
  • Removing the confidence guardrail.
  • Mixing non-tag images into the folder. Remember, the cleaner the photo, the faster the inventory.

Frequently Asked Questions

Can this read handwritten tags? It depends on the OCR engine, but generally, this is optimized for printed manufacturer labels. Handwriting is much harder to predict and may result in lower confidence scores.

What happens if there is no serial number on the tag? The AI is instructed not to guess. If it cannot find a serial number, it will likely return a low confidence score, and the image will be moved to the “Needs Review” folder for you to check manually.

Does this work with any smartphone? Yes. As long as the phone can upload images to Google Drive (via the app), it works. You can use an iPhone, Android, or even a tablet.

Is my data private? You are using your own Google Drive and your own AI API key. The data stays within your controlled accounts and is not shared with a third-party platform.

Conclusion

Inventory shouldn’t be a typing contest.

This automation turns photos into structured inventory data automatically. It reduces fatigue, eliminates most manual entry, and gives you confidence in your records.

Once you have used the Retail Appliance Model & Serial Tag Parser Using AI and n8n, you will never want to inventory appliances the old way again.

Ready to stop crawling behind appliances? Contact us at Super Service Bros.